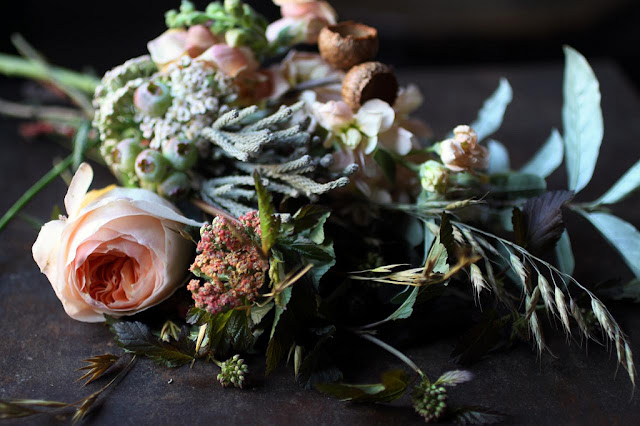
I have been dwelling on this post for the entire summer. Initially, I wanted to gather a collection of my favorite florists, but I think what I really want to tell you about is the very lovely and talented Sarah Ryhanen.
Sarah combines even the most unlikely plant materials (like tomatoes!)
with gorgeous blooms into the most glorious, moody arrangements. In
Sarah's blog, Saipua, she
specifically speaks to my New York nostalgia, but also, to my
simultaneous longing to live a simple rustic life. She is both city and
country, and her arrangements magically reflect that.
Flowers have a place with food and entertaining. They make everything feel a little more special, they slow down our pace, invite us to linger over dessert. Maybe Sarah's artistry will inspire you to create something lovely for your own dinner table using plants from your own yard, ones that you had never thought of using before.
All these gorgeous photos were taken by Sarah Ryhanen! She's an amazing photographer, as well!
Saturday, September 15, 2012
Flowers for the Table
Wednesday, August 29, 2012
Honeyed Goat Cheese and Corn Salad
As we slide into fall, and the corn starts disappearing from the grocery shelves, I wanted to share a recipe to savor those last bits of summery sweetness. This salad is a perfect summer side. The fresh corn with tangy goat cheese and bright cilantro evoke delightful thoughts of sombreros and margaritas. My favorite kind of thoughts, really. Someday soon, I really need to visit Mexico, as it's clear I'm pretty obsessed with their cuisine. This side is great with my pork and blue cheese empanada recipe, so try the two together!
Honeyed Goat Cheese and Corn Salad
Ingredients:
4 Ears of Corn, Husks Intact
2 Tablespoons of Cilantro, Minced
2 Tablespoons of Chevre
1 Tablespoon of Honey
1/2 Teaspoon of Salt
Cooking:
Place the ears of corn, husks and all, on a cookie sheet and into the oven at 450 degrees. There's no need to pre-heat. Check on the corn periodically and turn with tongs so that all sides of the husk get browned. Once the husks are a medium brown color in most areas, remove the corn from the oven. Let the ears cool, then remove the husks and silk, then slice the corn from the cob with a sharp knife. Mix the corn with the other ingredients and serve!
Labels:
chevre,
cilantro,
Corn,
Goat Cheese,
Honey,
Salad,
Side,
Summer,
Vegetarian
Tuesday, July 24, 2012
Spicy Cilantro Sesame Slaw
Southern coleslaw can sometimes be an unappealing concoction of soggy cabbage swimming in miracle whip. This recipe is a lighter, fresher version that I have been making this summer. I love the nutty sesame flavors combined with the bite of the jalapeno and creamy, tangy-ness of the yogurt.
Spicy Cilantro Sesame Slaw
Ingredients:
1 Small Head of Cabbage, Very Thinly Sliced
4 Carrots, Very Thinly Sliced
1/4 Cup of Cilantro, Finely Chopped
2 Jalapenos, Minced
2 Tablespoons of Greek Yogurt
Juice of 1/2 Lime
1 Tablespoon of Sesame Oil
1 Tablespoon of Soy Sauce
1 Teaspoon of Toasted Sesame Seeds
1 Teaspoon of Salt
Preparation:
In a large bowl, toss the cabbage with the carrots, cilantro, and jalapeno. Sprinkle with the salt and sesame seeds, then dress the mixture with yogurt, lime juice, sesame oil and soy sauce. Toss thoroughly and serve!
Tuesday, July 10, 2012
Sparkling Bittersweet Summer Cocktail
I am a nut for sparkling wine. I know it can be super cheesy and cliche, but when it hits your lips, it tastes so good! (Old-School, anyone?!) One recent Friday evening, feeling overwhelmed and in need of some alone time, I stopped off at the store and picked up a bottle of bubbly. There's something wonderfully indulgent about taking a lovely flute of something sparkling outside on a quiet summer evening. It was just what I needed!
Sparkling Bittersweet Summer Cocktail
Ingredients:
1/2 Ounce of Lillet Blanc (A sweet french wine, similar to dessert wines)
2 Dashes of Angostura Bitters
2-3 Ounces of Sparkling Wine (Depending on how tall your flutes are)
Preparation:
Pour your Lillet Blanc* into your flute. Top off with sparkling wine and add your bitter dashes! Voila!
*Note about Lillet Blanc: It's this really delicious sweet, desserty wine which can be served alone as an aperitif or it's great to keep on hand for the sweet note in your cocktails. I also like it with gin cocktails!
Labels:
Bitters,
Bittersweet,
Cocktail,
lillet blanc,
Sparkling Wine,
Summer
Tuesday, May 22, 2012
Red Wine & Bacon Braised Kale and Endive
I'm not sure what happened here. I was on a real roll this year, posting every single week and so proud of myself! Somehow, life got a little busy and in the way of things I enjoy doing for myself, like this blog. And cooking, for that matter. I feel like there has been way more Trader Joe's frozen Indian food in my life than I would truly like to admit.
This recipe is something my husband and I enjoyed a few weeks ago for brunch, and while, (hold your breath for a very-un-southernly admission,) I don't normally enjoy greens, I love the light bitter taste of the kale with the tangy vinegar and salty bacon. With a fried egg on top, it's pretty great!
Red Wine & Bacon Braised Kale and Endive
Ingredients:
1/4 Pound of Bacon
2 Cloves of Garlic, Minced
1/2 Onion, Minced
3 Cups of Kale and Endive, Roughly Chopped
1 Cup Chicken Stock
1/2 Cup of Red Wine
1 Tablespoon of Chili Flakes
Salt to Taste
Splash of Red Wine Vinegar
Cooking:
In a large frying pan, cook your bacon on medium heat. Remove the bacon once it's crispy and cooked to your preferred crunch. Pour out all but 3 tablespoons of bacon grease, and reserve for another recipe if you desire, like some fried sage baconnaise. Add in the onion and garlic. Cook until the onion is translucent. Add the kale, endive, stock, wine and chili flakes to the pan. Continue cooking for 35 minutes on low heat until the kale is wilted and soft and the sauce is reduced. Chop 2-3 pieces of bacon into bits and stir into the wilted greens. Add your salt to taste and a splash of vinegar. I think this is perfectly served with a fried egg over the top, and your remaining bacon on the side!
Wednesday, April 4, 2012
Fried Garlic and Sage Baconnaise
A few weeks ago, I tried going on this diet called, The Paleo Diet or The Caveman's Diet. I very quickly realized that there was no way that I could keep it up. It was just way, way too much meat for me, and I already had a bit of green guilt over the meat that I currently include in my diet. I did have an awesome take-away though. Baconnaise! I have been wanting to try my hand at homemade mayonnaise and adding bacon to the mix sounded even more delicious. This recipe is fantastic on sandwiches, or another idea and my husband's favorite, sweet potatoes.
Fried Garlic and Sage Baconnaise
Ingredients:
2 Egg Yolks
1/2 Cup of Bacon Grease
1/2 Cup of Olive Oil
3 Sage Leaves
1 Clove of Garlic, Peeled
1 Teaspoon of Whole Grain Mustard
Juice of 1 Lemon
Pinch of Salt, to Taste
Preparation:
Heat the bacon oil in a sauce pan on medium heat. Place the garlic cloves and sage leaves into the oil. Fry the garlic and sage until the sage leaves are crispy and the garlic is just turning light golden brown. Chop the sage and garlic, then set aside. Let the grease come back to room temperature, then add in the olive oil. In an electric blender, whisk the egg yolks, a teaspoon of lemon juice, and the mustard on low speed. Once the mixture is smooth and incorporated, slowly, slowly start adding the oil mixture. Add something like a teaspoon at a time, wait until it is completely incorporated, then repeat until the oil is completely incorporated. As the baconnaise starts to thicken, you can add the oil a little bit faster. Once the oil is mixed in, add the remaining lemon juice and the chopped garlic and sage. Add salt to taste. It will be thinner than regular mayonnaise at first, but refrigerate and it will thicken to normal consistency.
(Really Important) Note - Don't cheap out on the bacon. The oil, therefore the baconnaise, will be fairly flavorless if you use cheap bacon for the grease. I recommend using Applegate Farms Smoked Organic Bacon. It's pretty delicious on its own and the grease is very flavorful.
Labels:
Bacon,
Baconnaise,
Condiment,
Egg,
Garlic,
Mayonnaise,
Sage,
Sandwich,
Sauce
Wednesday, March 21, 2012
Art for the Kitchen Walls
This week, I have been thinking about dressing up my cubicle at work with a little art, but I keep coming across pieces that I would love to have in my kitchen. I wanted to share a few of my very favorites.
This mushroom print is pretty fabulous. I love the organic botanic style. It's called, Mushrooms, by Wendy MacNaughton on one of my favorite go-to sites for good and affordable art, 20x200.
I have such a hard time picking a favorite from this artist, Joel Penkman. All of his paintings are stunning! And you can buy his prints of them on Etsy!
This is such a great modern shot! I always think that pastry tips are such lovely sculptural objects and this photo, titled Cake, by Bomobob, is on another great art site, Society 6.
These two prints are by the super awesome Stanley Chow! I love the humor and bold, graphic style. (I love his stuff so much that Michael Caine, may, or may not be, hanging in my living room!) You can buy Stanley's prints on his iphone app, as well as his site here.
Labels:
20x200,
Art,
Bomobob,
Food Art,
Joel Penkman,
Kitchen Essentials,
Society 6,
Stanley Chow,
Wendy MacNaughton
Tuesday, March 13, 2012
Vanilla Simple Syrup
One of my favorite treats when I'm out and about are those delicious tea lattes from that ubiquitous coffee chain, but I also love recreating the experience at home for a fraction of the cost. This is the secret ingredient, and it's super easy to make. You could also use this syrup in coffee, hot chocolate, or even in a cocktail recipe!
Vanilla Simple Syrup
Ingredients:
3 Cups of Sugar
3-1/2 Cups of Water
1 Vanilla Bean
Cooking:
Take the vanilla bean and slice it in half, lengthwise. With the tip of a paring knife, scrape the seeds from the flesh. In a saucepan, pour in your water and sugar together, then add the vanilla bean halves and the seeds. Whisk over medium heat until the sugar is completely dissolved. Remove the bean halves and pour into a resealable container. It will be good for a week or two, but if you have a sweet tooth in the morning, like I do, it will be gone before then!
Tuesday, March 6, 2012
Chicken Stock
Making stock from scratch is dead simple and it's such a good way to use every bit of the chicken. I very often will buy a whole organic chicken, remove the meat for use in other dishes, then use the carcass for amazingly fragrant stock. Once the carcass is cooked, you can pull off the extra meat for a small helping of chicken salad. I make a huge batch of the stock, then freeze in smaller containers, pulling it out as needed, until it's time to make more. You can put just about anything edible in the pot for extra flavor. This batch had radish greens and tops and some cauliflower stems in addition to the other ingredients. It's so easy and a great way to save a few extra pennies!
Chicken Stock
Ingredients:
1 Whole Chicken, Breasts, Thighs and Wings Removed
8 Cups of Water
1 Lemon
1 Carrot
1 Celery Stick
1 Peel and Outer Skin of an Onion
2 Garlic Cloves (Leave the Peel On!)
3 Bay Leaves
1 Tablespoon of Black Pepper
1 Teaspoon of Salt
1 Teaspoon of Whole Cumin Seeds
Any Other Clean Vegetable Scraps!
Cooking:
In a very large stockpot, put in all of your ingredients and bring the water to a boil. Once boiling, reduce to low heat and simmer, covered, for approximately 2 hours. Strain the stock and store. DONE! It's that easy!
Monday, February 27, 2012
Lemony Kale Salad
Greens are so good for you, but I have such a hard time eating them. It's that bitter dirt taste that turns me off. After tasting my friend, Paul's, kale salad recipe, I realized kale is very different from its collard cousin. The bitterness is less intense and can be cut with lemon juice and salty Parmesan. Now, when I make a giant bowl of this, it doesn't last longer than the one meal. One step closer to Pop-Eye!
Lemony Kale Salad
Ingredients:
20 Stems of Kale
Juice of 1 Lemon
1 Tablespoon of Olive Oil
1/8 Cup Shaved Parmesan
1 Clove of Garlic, Minced
1/8 Teaspoon of Salt
1/8 Teaspoon of Chili Flakes
Cooking:
Cut the stems away from the leaf of the kale and discard. Roughly chop the leaves and place into a steamer. Steam the leaves for 6-8 minutes until just softened. Meanwhile prepare an ice bath in a large bowl. Once cooked, drop the kale into the ice bath. Once the kale is cooled, strain and pat dry excess water or spin in a salad spinner. Place the kale in a large mixing bowl and stir in the other ingredients with tongs until thoroughly combined. I like to put this salad into the fridge and let it marinate overnight, since the flavors seem to age well together, but it's great straight away, too!
Monday, February 20, 2012
Vanilla Pecan Pancakes
The first year my husband and I moved into our house, I very ambitiously tilled up a 400sqft bit of earth to grow vegetables in our tiny backyard. Next, I carefully transplanted about 40 plants which I had babied from little tiny seeds into delicate seedlings. Somehow, though, I failed to pay attention to the giant pecan tree which prevents the backyard from getting enough sun to ever produce a lovely tomato or pepper. I gave up on the vegetable garden out back and moved it to our even smaller front yard. While I have accepted that my vegetables are going to be in a more non-traditional location, I kept waiting for the pecan tree to actually produce. Two years went by, but we finally have pecans this year; a gorgeous, giant bowl of pecans (the squirrels were good enough to leave us a few) that came from our own pecan tree.
I have been making pancakes from the Joy of Cooking recipe since I was 4 years old. The recipe is so simple and adaptable. You can include almost any item into the batter: nuts, fruits, etc. This local pecan version might be my favorite yet, but maybe that's the locavore excitement I'm tasting.
Vanilla Pecan Pancakes
Ingredients:
1-1/2 Cups All-Purpose Flour
3 Tablespoons of Sugar
1 Teaspoon of Salt
1-1/2 Teaspoons of Baking Powder
1/2 Cup of Chopped Toasted Pecans
1/8 Teaspoon of Cinnamon
1/8 Teaspoon of Nutmeg
1-1/2 Cups of Milk
2 Large Eggs
1 Teaspoon of Vanilla Paste (or Vanilla Extract)
3 Tablespoons of Melted Butter
Butter for the Griddle/Pan
Cooking:
Whisk together the flour, sugar, salt, baking powder, spices and pecans in a large bowl. In a separate bowl, whisk the eggs, milk, vanilla paste and melted butter together, then pour into the dry ingredients. Stir until the dry ingredients are just incorporated. Don't over stir. On a griddle or a saucepan, greased with butter, on medium heat, pour 1/2 cup of batter per pancake. You may be able to do more than one at a time with a griddle. Cook until the center of the pancake's bubbles pop and lift the edges to see if the center is golden brown. This may take around 5 minutes or so. Slide a spatula underneath the pancake and flip it. The second side will take much less time. Remove the pancake when both sides are lightly browned. Serve with syrup and more butter!
Monday, February 13, 2012
Seeds, Seeds, Seeds!
At this time of year, my brain starts whirring with ideas for the year's garden. I gather my seed catalogs, Seed Savers Exchange and Territorial Seed Company winning favorites for this year, along with my boxes of leftover seeds from last year. I carefully catalog what I have and then I get to shop for new fun things that I might be missing. I cannot wait to try some rhubarb plants this year. I know they don't do very well in the hot south, and that my space in the garden is so limited, but I just can't resist the idea of having that gorgeous fruit in my very own yard! I'm also so excited to grow some fava beans this year. From the moment I watched Jamie Oliver crush raw favas, fresh from his garden, on Jamie at Home, I've longed to repeat the experience. So, now that I have placed the orders for the new stuff, the fun begins...I have to figure out where to squeeze everything in! I find a glass of wine helps!
Sunday, February 5, 2012
One-Eared Stag for Brunch
Last weekend, my husband and I felt we needed to venture out for a proper Sunday brunch. Looking for something a little more interesting than the usual french toast institutions and we were super excited to see that One-Eared Stag, one of my favorite dinner spots, serves a delicious brunch. One-Eared Stag opened last year in Inman Park, John Kessler gave it a great review here. I really like the innate "southernness" of the place; maybe "new southern" would classify it correctly.
We started brunch with a kimchi bloody mary. At first, I wasn't sure if the bitterness of the cabbage worked in the sweetly, salty, tang of a bloody mary, but one more sip and I was sold. I like the new layer of flavor, combined with the spiciness that defines kimchi.
As a sort of appetizer, we ordered the black pepper biscuits with peach marmalade. I've never had a black pepper biscuit before, but I am going to make them this way every time from now on! They were so good, especially with the sweet tart flavor of the peaches on top.
For our main courses, we shared the hanger steak with chimichurri over potato hash with fried eggs, and fried chicken and waffles with sorghum syrup and marrow butter. It was honestly hard to choose which was the favorite. The fried chicken and waffle were cooked to perfection. The chicken's golden crust was crunchy and salty, the meat was almost buttery, which was a gorgeous compliment to the sweet sorghum syrup and bready waffle. The steak was equally delicious, set off by the parsley and garlic in the chimichurri, and the creaminess of the runny egg yolks.
The best thing about One-Eared Stag, aside from the great food, is that the menu changes on a regular basis, dependent upon local, seasonal produce. (You can expect to see that amazing fried chicken on the menu on Sundays and Mondays, regularly.) Nothing excites me more than a Georgia restaurant using food grown in Georgia!
Labels:
Black Pepper Biscuit,
Bloody Mary,
Brunch,
Chimichurri,
Egg,
Fried Chicken,
Kimchi,
On the Town,
One-Eared Stag
Sunday, January 29, 2012
Hoppin' John
Hoppin' John is my favorite meal to have in the beginning of the new year. Since we were on vacation on New Year's day, I wasn't able to make the spicy, black-eyed pea goodness as usual. Back in town, I just couldn't stop craving it, so...I made a GIANT batch for just my husband and I! I had enough for lunches and still some to freeze for later. If you Google Hoppin' John, you will find loads of recipes. My recipe isn't ground-breaking, but is simple, fresh and can easily be cooked in a crock pot. It's a great Sunday night meal which will stretch into weekday lunches.
Hoppin' John
Servings: 6-8
Ingredients:
4 Strips of Bacon, Chopped into 1/2" Pieces
1 Ham Hock
3 Sticks of Celery, Diced
2 Green Bell Peppers, Diced
1 Orange Bell Pepper, Diced
1 Red Bell Pepper, Diced
1 Onion, Diced
3 Cloves of Garlic, Minced
2 Jalepenos, Minced
2 28 Ounce Cans of Diced Fire-Roasted Tomatoes
2 14 Ounce Cans of Chicken Stock
2 Cups of Soaked Black-Eyed Peas (or Canned Black-Eyed Peas)
2 Bay Leaves
1 Tablespoon of Paprika
1 Teaspoon of Salt
1 Teaspoon of Cumin
1/2 Teaspoon of Cayenne
4 Cups of Cooked Rice, For Serving
Cooking:
In a large saute pan, toss in your bacon pieces. Cook on Medium-High heat until they begin to render grease and are starting to brown just on the edges. Add in the garlic and jalepenos. Saute for 30 seconds, stirring, then add the celery, onion, and bell pepper. Cook until the onion goes translucent and the vegetables are just softened. In a large stock pot, or in a crock pot, place your ham hock. Add in the cooked vegetables and bacon, along with the tomatoes, stock, peas and spices. Simmer on low for 2 hours in the stock pot, or until the beans are cooked through. (For the crock pot, you could leave it on low for 6-8 hours.) Serve with the cooked rice and your favorite hot sauce. I like to stir in the rice and save the leftovers for lunch the next couple of days.
Labels:
Bacon,
Bell Pepper,
Black-eyed Peas,
Crock Pot,
Entree,
Hop n' John,
Hoppin' John,
New Year,
Rice,
Stew,
Tomato
Sunday, January 22, 2012
Butternut Squash and Ricotta Bruschetta
Last weekend, our awesome neighbors invited us over to watch the equally awesome Mr. Ricky Gervais host the Golden Globes. In honor of this Golden celebration, I made a golden appetizer. I really like the small kick of the jalepeno, combined with the savory of the garlic, the sweet of the honey and squash, the creaminess of the Ricotta and the saltiness of the Parmesan. It's like a perfectly balanced cocktail, but in appetizer form!
Butternut Squash and Ricotta Bruschetta
Ingredients:
1 Cup of 1/2" Cubes of Butternut Squash
4 Cloves of Garlic, 3 Cloves Minced and 1 Clove Reserved
1 Jalepeno, Minced
2 Tablespoons of Olive Oil
1 Teaspoon of Honey
1/4 Teaspoon of Salt
1 Cup Ricotta Cheese
1 Baguette
Parmesan Shavings for Topping
Cooking:
Pour your olive oil into a saute pan on medium heat. When the oil starts to wave, add in the minced garlic and jalepenos. Saute for 30 seconds, then add in the butternut squash. Saute for approximately 10 minutes, until the squash is softened. Add in the honey and salt, stirring to coat evenly. Meanwhile, slice your baguette into 1/2" thick slices, place on a cookie sheet and broil in the oven to toast lightly. Once slightly brown, remove the pan from the oven and rub each piece of toast with the reserved garlic clove. Next, spread a layer of ricotta onto the baguette slices, then top with the warm squash, followed by a few shaves of Parmesan.
Labels:
Appetizer,
Bruschetta,
Butternut Squash,
Golden Globes,
Jalepeno,
ricotta,
Toast
Sunday, January 15, 2012
Favorite Soup Making Tools
We definitely ramp up the soup production in the Cole household during wintertime. I make lots of chili and creamy soups, so I wanted to share some of my favorite kitchen items for soup making.
Le Creuset makes my all-time favorite cookware. (Let me add, no one pays me to say this!) I think the heat distribution is amazing and they come in beautiful colors. I have two pots, including a huge red dutch oven like this fabulous green one, that my mother received when she got married. They're over 30 years old and in amazing shape! The dutch oven is perfect for all sorts of things, but I use it most for soups and chili.
I have lots of knives, and I love my japanese knives from Global and Shun, but more often than not, this Wustoff Hollow Edge beauty is my workhorse. I use it for everything, really; dicing onions, mincing garlic, slicing tomatoes...it's great!
I really love creamy soups the most, so I almost always blend them with my stick blender. This is sort of a fancier version of the blender I have, (because they no longer make the kind I have.) I think that any stick blender is a huge help for a soup lover. Being able to leave the soup in the pot, without transferring it to a blender or a food processor is pretty nice, and the soup comes out incredibly smooth!
Labels:
Dutch Oven,
Kitchen Essentials,
Knives,
Soup,
Stick Blender,
Tools
Tuesday, January 3, 2012
Navy and Gold Dinnerware Round-up
I have a weakness for ceramics. Often I dream of setting a beautiful, fancy table with an assortment of plates and serving ware. I love the idea of mixing and matching plates, and bowls, especially as it seems more obtainable to have just one piece than the whole crazy-expensive set!
Here are a few of my current favorites which I think would make a lovely setting for your first dinner party of the New Year...
This plate is by one of my very favorite artists, Hella Jongerius. It's of her Nymphenburg Sketches Animal Bowl Series.
And this one...from the same collection, called the Game Plates.
From Jasper Conran for Wedgwood, 'Navy Fringe.' Jasper Conran makes so many lovely things!
From Gien France, 'Sultana.' I like the bit of folkiness to this one.
From Alessandro Zambelli, 'Gold Tub.' Because Brussels Sprouts would be so lovely in gold...
From Diane Von Furstenburg, 'Brushstroke.' I think flourless chocolate cake would look so delicious on this painterly plate.
Labels:
Ceramics,
Diane Von Furstenberg,
dinnerware,
Gold,
Hella Jongerius,
Jasper Conran,
Navy,
New Year,
Tablescape,
Tablesetting
Subscribe to:
Posts (Atom)